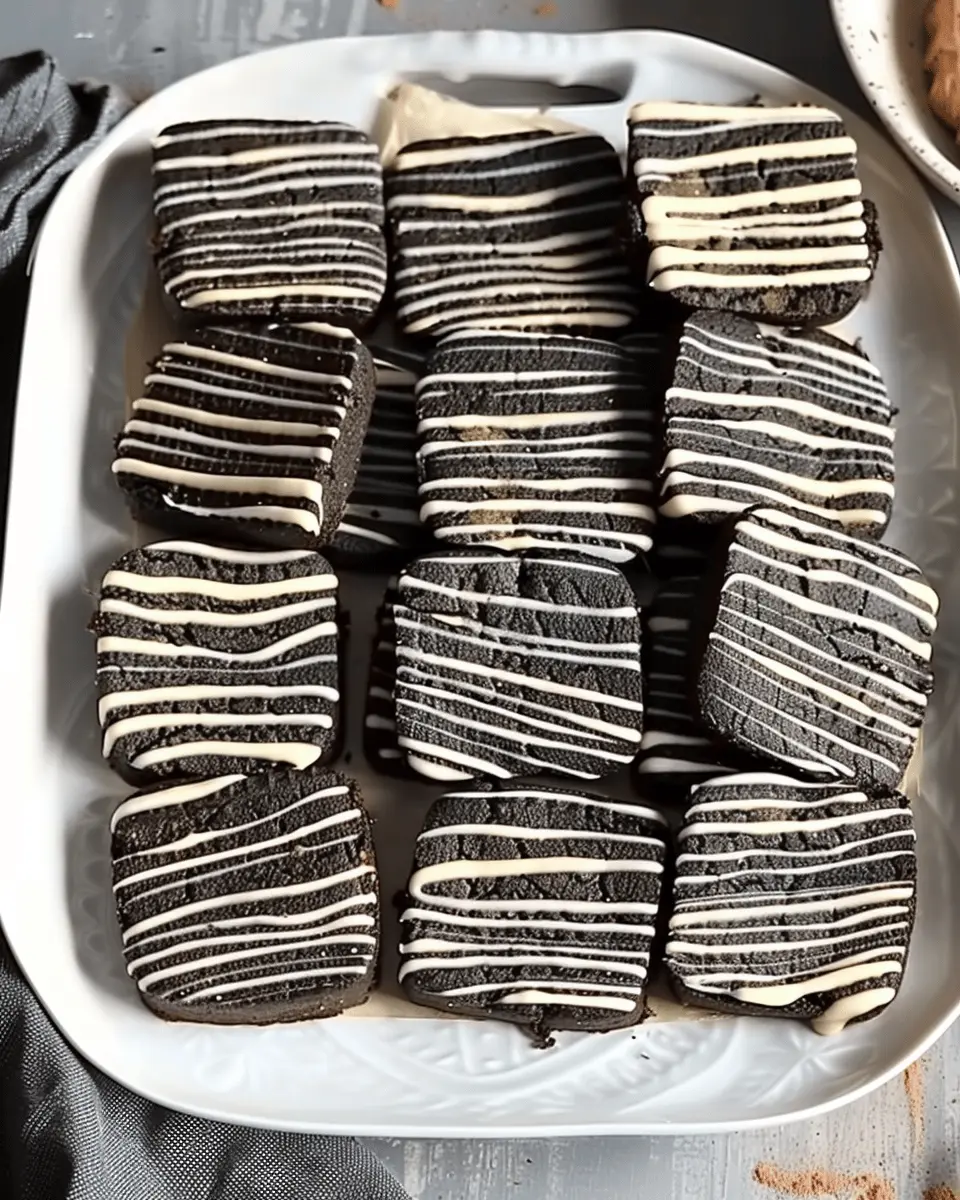
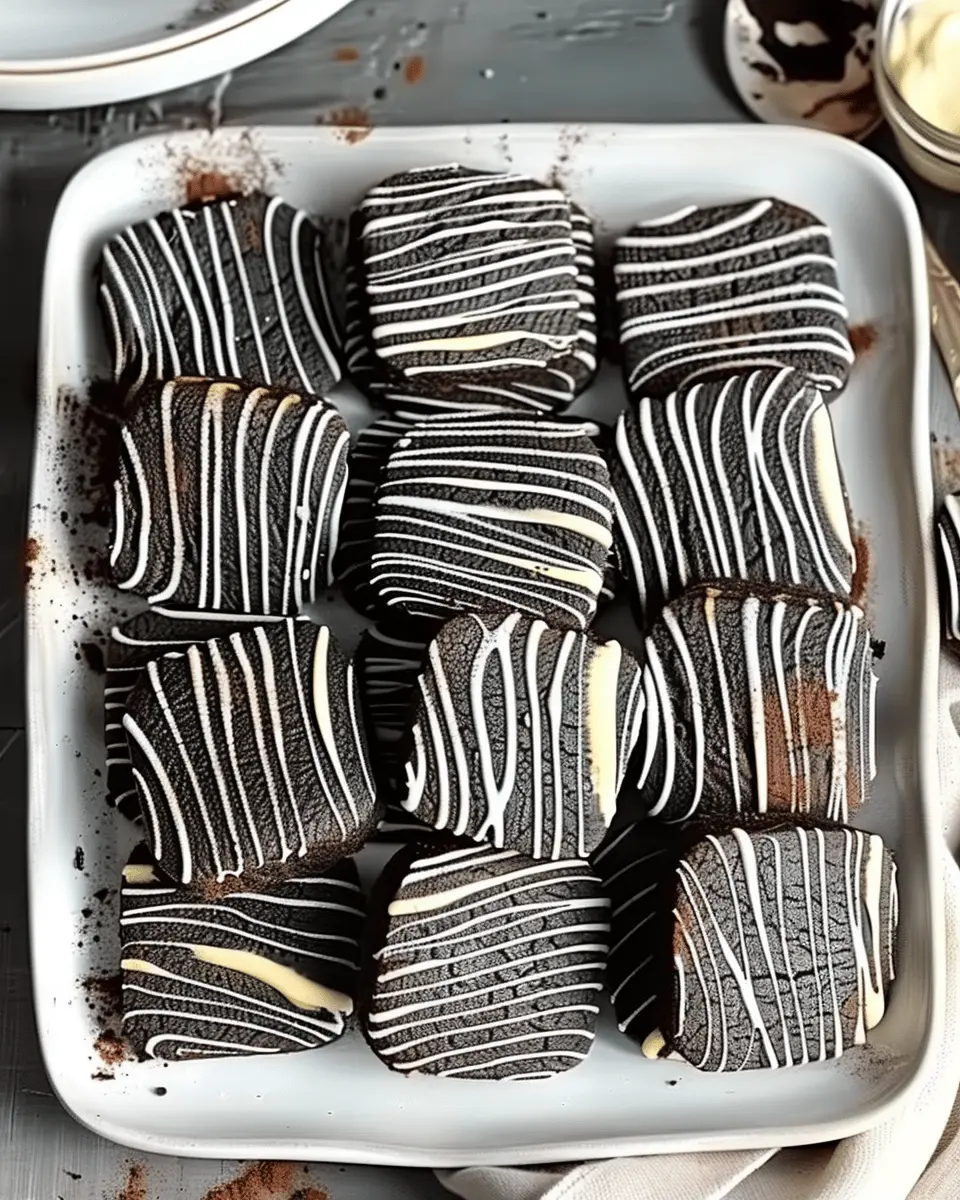
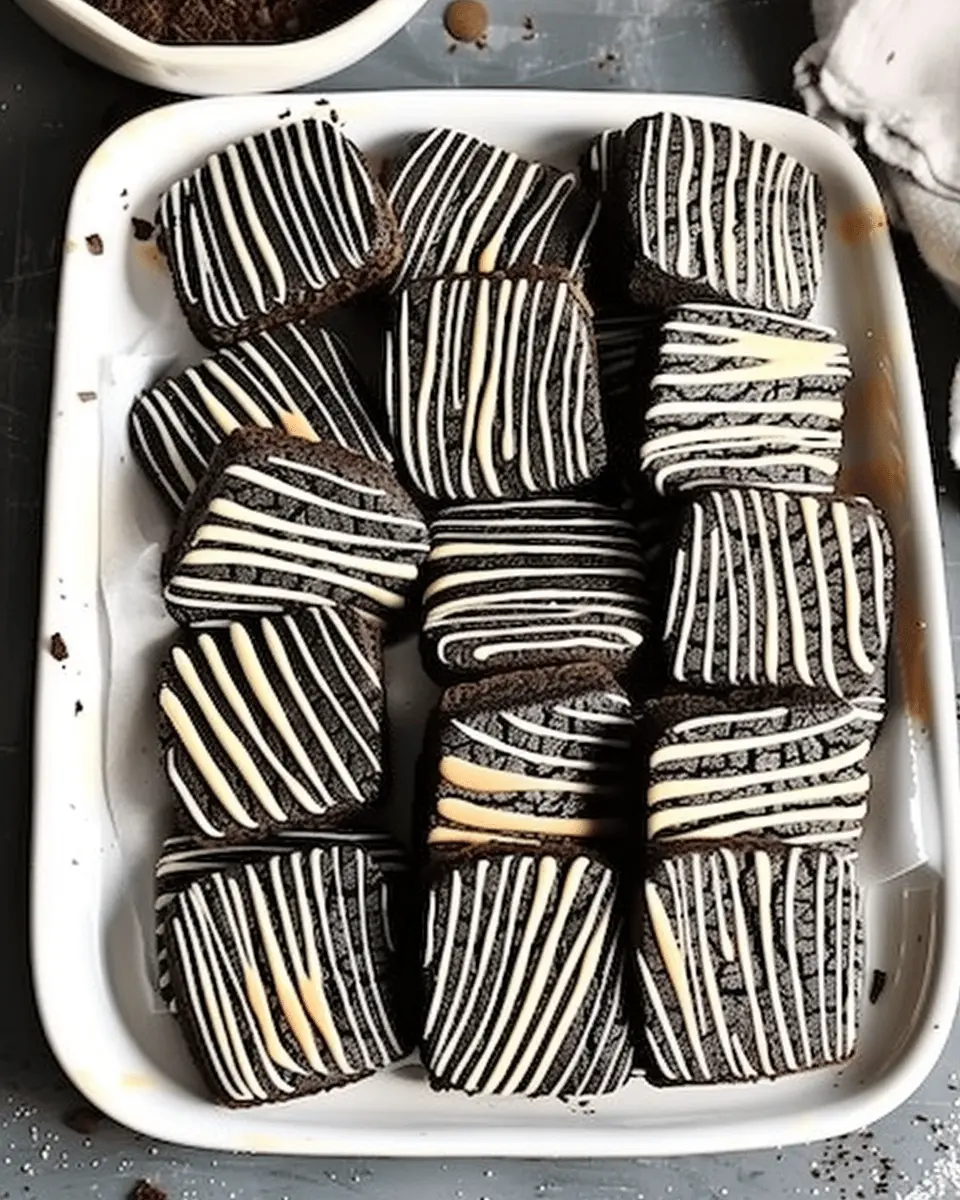
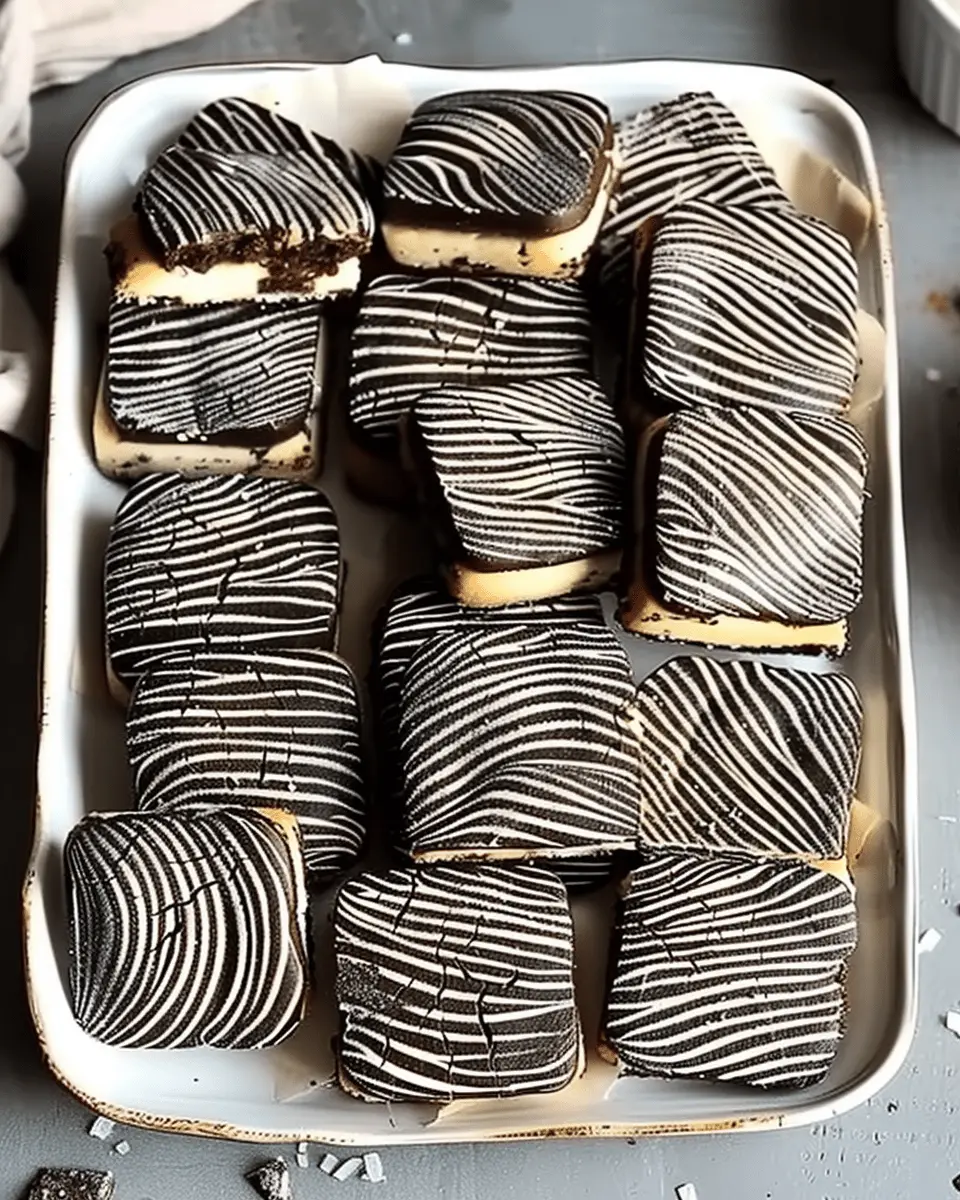
Introduction to Zebra Cookies
Zebra cookies are truly a treat that can bring a smile to anyone’s face. Picture this: a delicate cookie that combines the rich, deep flavors of cocoa with the sweet, buttery notes of vanilla, all swirled together into a marbled masterpiece. These delightful desserts not only tantalize the taste buds but also provide a visual feast — the striking contrast of colors makes them perfect for any occasion, from casual coffee breaks to festive gatherings. But what exactly makes zebra cookies stand out in the world of baked goods?
What makes zebra cookies a delightful treat?
First off, the texture of zebra cookies is simply divine. Imagine biting into a soft, chewy cookie that effortlessly crumbles while still maintaining that satisfying bite. The contrasting flavors of chocolate and vanilla create a harmonious balance that appeals to many different palates. It’s the perfect cookie for those who can’t decide between the two — it’s like having the best of both worlds in each delicious bite!
In addition to their delightful taste, zebra cookies are surprisingly simple to make. Even if you’re a novice in the kitchen, you’ll find that whipping up these beauties is a breeze. Minimal ingredients and straightforward techniques mean you can bake a batch in no time, and it also allows for some creativity if you want to add your twist. Why not try adding a sprinkle of sea salt or a dash of espresso for a little extra oomph?
Plus, zebra cookies are incredibly versatile. They can be served as an afternoon snack or dressed up for a party platter. If you’re feeling adventurous, you might even consider turning them into ice cream sandwiches or pairing them with a silky cup of hot cocoa. If you’re curious about other flavor combinations, check this source on cookie variations for inspiration!
These charming cookies not only bring joy to the table but also spark conversations. So whether you’re baking them for yourself or sharing them with friends, zebra cookies surely will be a hit. Grab your apron, and let’s dive into this culinary adventure together!
Ingredients for Zebra Cookies
Essential ingredients for making zebra cookies
Making zebra cookies is a delightful experience! Here are the essential ingredients you’ll need to master this treat:
- Flour: All-purpose flour serves as the foundation for these cookies, giving them the perfect texture.
- Cocoa powder: This adds the rich chocolate flavor that distinguishes the dark halves of your cookies.
- Butter: Unsalted butter is ideal for balanced flavor, so don’t forget to soften it!
- Sugars: A mix of granulated and brown sugar enhances sweetness and adds moisture.
- Eggs: These act as a binding agent, helping the cookies hold their shape.
- Baking soda: This provides the necessary rise for your cookies to puff up nicely.
- Vanilla extract: A splash of this elevates the flavor profile, making your zebra cookies irresistible.
Optional ingredients for customization
Feel free to get creative with your zebra cookies! Here are some optional ingredients to customize your batch:
- Chocolate chips: Toss in some semi-sweet chocolate chips for extra indulgence.
- Nuts: Chopped walnuts or pecans can add a delightful crunch.
- Sprinkles: For a fun touch, decorate your cookies with colorful sprinkles.
- Frosting: A light draping of vanilla or chocolate frosting can take them over the top.
By experimenting with these ingredients, you can make zebra cookies that are uniquely yours. For a deeper dive into the science of baking, check out resources like King Arthur Baking. Happy baking!
Step-by-step Preparation of Zebra Cookies
Making zebra cookies is not just a culinary endeavor; it’s a delightful experience that combines flavor with creativity. If you’re longing for a treat that impresses both in taste and presentation, let’s dive into this step-by-step guide.
Gather and Prep Your Ingredients
To create mouthwatering zebra cookies, it’s crucial to have all your ingredients at hand. Here’s a simple list to get you started:
- 1 ¾ cups all-purpose flour
- ½ cup unsweetened cocoa powder
- ¼ teaspoon baking soda
- ½ teaspoon salt
- ¾ cup unsalted butter, softened
- 1 cup granulated sugar
- ¼ cup brown sugar
- 1 large egg
- 1 teaspoon vanilla extract
Before you start mixing, it’s good to ensure everything is measured and ready. Preheating your oven to 350°F (175°C) will save you time when you’re ready to bake, as you’ll want those cookies hot and fresh from the oven.
Mix the Dry Ingredients for the Base
In a mixing bowl, whisk together your dry ingredients:
- All-purpose flour
- Cocoa powder
- Baking soda
- Salt
This step is critical to ensure even distribution of the leavening agent (baking soda) and the cocoa powder throughout your cookie dough. If you haven’t worked with cocoa powder before, savor the aroma as you mix it in—it’s one of the true joys of baking!
Cream the Sugars and Butter
Now, onto the fun part! In a separate large bowl, beat the softened butter, granulated sugar, and brown sugar together using an electric mixer or a whisk. You’re aiming for a light and fluffy mixture—this process incorporates air that helps your zebra cookies achieve a perfect texture.
Don’t forget to add the egg and vanilla extract, mixing them well until fully integrated. The warmth of the vanilla will linger in the kitchen, inviting you to keep going.
Combine and Form the Zebra Cookie Dough
Gradually add your dry mixture to the creamed butter and sugars. Mix until just combined; over-mixing here can lead to tougher cookies. Be creative—sometimes combining with your hands lets you feel the texture better, so don’t hesitate to get in there if you want!
Create the Visual Stripes
This is where the magic happens! Divide the dough in half. To one half, add a splash of food coloring or just leave it as is for a classic look. You’ll want to roll each half into logs or small balls, depending on your preference.
Then, take pieces from each dough and layer them next to each other, forming a new log. When sliced, you’ll see those beautiful contrasting colors. This step may feel a bit artsy—you’re essentially painting with your dough!
Chill and Bake the Cookies
Chilling your zebra cookies dough for about 30 minutes helps them hold their shape during baking. Once chilled, slice the logs into your desired thickness. Place them on a baking sheet lined with parchment paper, giving each a little space.
Bake them in your preheated oven for about 10-12 minutes. As they bake, you’ll be able to smell the delightful combination of cocoa and butter filling your kitchen.
When you pull them out, let your zebra cookies cool on the tray for a few minutes before transferring them to a wire rack. This helps them set just right.
Enjoy the charming taste of your creation. Sharing these cookies with friends or family can be a delightful way of making memories and enjoying your baking skills! For more in-depth tips on cookie decorating, check out resources like The Spruce Eats.
With this step-by-step guide, you’re on your way to creating a beautiful batch of zebra cookies. Happy baking!
Variations of Zebra Cookies
Zebra Cookies with a Chocolate Twist
Looking to jazz up your classic zebra cookies? Try adding a touch of dark chocolate to the mix. Not only does dark chocolate enhance the flavor, but it also gives a more decadent texture. Simply melt some dark chocolate and swirl it into your cookie batter alongside the usual vanilla. This twist creates a richer, more intense flavor profile that chocolate lovers will adore. Plus, if you sprinkle a bit of sea salt on top before baking, the contrast will elevate that sweet-salty experience you didn’t know you needed!
Vegan Zebra Cookies
For those embracing a plant-based lifestyle, vegan zebra cookies are a fantastic option that doesn’t skimp on taste. Replace traditional butter with coconut oil or a vegan butter substitute. And instead of eggs, use flaxseed meal or applesauce to bind the ingredients together. The result? Deliciously chewy cookies that are not just kind to animals but also packed with flavor.
If you’re curious, brands like Earth Balance and Just Egg offer excellent vegan alternatives that can easily be found in most grocery stores.
By exploring these variations, you’ll discover how versatile zebra cookies can really be! So, whether you’re indulging in chocolate swirls or whipping up a vegan batch, these cookies are sure to impress. Enjoy baking and have fun experimenting with these delightful twists—you might just create a new favorite!
Cooking Tips and Notes for Zebra Cookies
Tips for Achieving the Perfect Balance of Flavors
When it comes to zebra cookies, the key to a harmonious flavor lies in the balance between chocolate and vanilla. Here are a few tips:
- Quality Ingredients: Use high-quality cocoa powder for that rich chocolate flavor. It makes a noticeable difference.
- Vanilla Extract: Opt for pure vanilla extract rather than imitation to elevate the cookie’s sweetness.
- Experiment with Sugar: Adjust the sugar to your taste. If you prefer a sweeter cookie, adding an extra tablespoon might work wonders.
Notes on Storage and Freshness
To keep your zebra cookies fresh and delicious:
- Airtight Containers: Store your cookies in airtight containers to maintain their texture.
- Freezing Tips: You can freeze unbaked dough for up to three months. When you’re ready to indulge, just slice and bake!
- Shelf Life: Typically, they last about a week at room temperature—if they last that long!
For more insights on using ingredients wisely, consider reading this guide on storing baked goods effectively. Happy baking!
Serving Suggestions for Zebra Cookies
Ideal Pairings for Zebra Cookies
When it comes to enjoying your zebra cookies, think about delightful pairings that amplify their rich flavors. Try serving them with:
- A comforting cup of cocoa or chai tea: The spices blend beautifully with the chocolatey notes.
- Fresh fruit: Slices of strawberries or raspberries provide a refreshing contrast that balances the sweetness.
- A scoop of vanilla ice cream: This creates a decadent dessert combo, perfect for a cozy evening in.
- Nut butters: A thin spread of almond or peanut butter can add a nutty twist to each bite.
Considering the versatility of these cookies, even a simple cup of herbal tea can enhance the experience—check out options like chamomile or mint for a delightful contrast!
Creative Ways to Present Zebra Cookies
Presentation is key when serving up zebra cookies. Here are some fun ideas:
- Tiered dessert stands: Create an eye-catching display that makes your cookies the star of the show.
- Mason jars: Pack a few cookies in jars for a charming gift. Add a ribbon for a personal touch!
- Plates with some greenery: Lay a few cookies on a platter surrounded by fresh mint or basil—this elevates the aesthetic.
Consider how a well-presented plate can spark conversations at your gathering. Impress your friends and family, and enjoy sharing these delicious treats!
Time Breakdown for Zebra Cookies
Preparation time
Making zebra cookies is a fun and rewarding process that begins with about 30 minutes of preparation. This includes mixing your dough, rolling it into logs, and chilling it for that perfect consistency. It’s the time when you can get creative with flavors. Have you thought about adding a sprinkle of sea salt?
Baking time
Next comes the baking, which takes around 12–15 minutes. Keep an eye on those delightful little cookies—it’s when they just start to get that golden edge that they’re at their best!
Total time
In total, you’ll need about 50 minutes to whip up a batch of these zebra cookies. This includes prep and baking time, but don’t forget to carve out a little extra for indulging in your masterpiece afterward! For additional tips on perfecting your baking technique, check out the insightful resource on baking timings from BBC Good Food.
Nutritional Facts for Zebra Cookies
Calories per serving
One serving of zebra cookies typically contains about 150 calories. This makes them a sweet treat that you can enjoy without completely derailing your diet. However, it’s always good to keep portion sizes in mind—they can add up quickly!
Sugar content
Zebra cookies are known for their delightful sweetness, which generally comes from around 10 grams of sugar per cookie. For those who monitor their sugar intake or are following a specific diet, this number can be quite important.
Dietary considerations
When it comes to dietary restrictions or preferences, zebra cookies can be versatile. They can be made with whole wheat flour for extra fiber or swapped out with alternative sweeteners if you want to reduce sugar. Additionally, if you’re considering gluten-free options, almond flour or coconut flour can be great substitutes. For more information on healthy baking substitutions, check out the American Heart Association for expert guidelines.
Whether you’re indulging or baking with health in mind, zebra cookies offer both flavor and fun. Do you have any favorite tips for making these cookies even more delightful?
FAQs about Zebra Cookies
How can I make my zebra cookies chewy?
To achieve that delightful chewy texture in your zebra cookies, consider the following tips:
- Use brown sugar: It helps to retain moisture, resulting in a softer cookie.
- Don’t overbake: Pull them out when they’re just set and still soft in the center. They’ll continue to firm up as they cool.
- Chill the dough: Letting your dough rest in the fridge for at least an hour before baking can improve the texture, making your cookies even chewier.
What’s the best way to store leftover zebra cookies?
If you find yourself with leftover zebra cookies (which can be a miracle or a misfortune!), proper storage is key to keeping them fresh. Consider these methods:
- Airtight container: Store them in an airtight container at room temperature. They’ll stay soft for several days.
- Refrigeration: For longer storage, place them in the refrigerator. Just be sure to wrap them carefully in plastic wrap or foil to prevent drying out.
- Freezing: If you want to stash some away, freeze the cookies. Layer them with parchment paper in a freezer-safe bag, and they can last up to three months.
Can I incorporate different flavors into zebra cookies?
Absolutely! One of the best parts of making zebra cookies is the opportunity for customization. Here are some ideas:
- Citrus zest: Enhancing your dough with lemon or orange zest brings a bright flavor.
- Spices: Incorporate cinnamon or nutmeg for a warm twist.
- Add-ins: Consider mixing in chocolate chips, nuts, or even dried fruit like cranberries for an extra flavor punch.
By experimenting with flavors and textures, your zebra cookies can become your very own signature creation. For more tips on flavor combinations, check out resources like Serious Eats and Bon Appétit for inspiration. Happy baking!
Conclusion on Zebra Cookies
Embracing Homemade Treats
Zebra cookies represent more than just a delightful dessert; they embody the joy of creating something special in your own kitchen. There’s a magic in combining rich chocolate and sweet vanilla to form these eye-catching treats. As you bake, you’re not just following a recipe; you’re crafting memories and sharing flavors that define your culinary experience.
Encouraging your friends or family to join in can create a fun and interactive atmosphere. Why not host a cookie-baking night? It’s a fantastic way to bond while you whip up a batch of zebra cookies. Plus, homemade goodies are so much better than store-bought!
For additional tips on baking techniques, check out the resources from the Food Network or Serious Eats. Happy baking!
PrintZebra Cookies: Easy Indulgence for Your Homemade Treats
Delight in the rich flavors of Zebra Cookies, a perfect blend of chocolate and vanilla in a delightful striped pattern that is sure to impress.
- Prep Time: 20 minutes
- Cook Time: 15 minutes
- Total Time: 35 minutes
- Yield: 24 cookies 1x
- Category: Desserts
- Method: Baking
- Cuisine: American
- Diet: Vegetarian
Ingredients
- 1 cup all-purpose flour
- 1/2 cup unsweetened cocoa powder
- 1/2 cup granulated sugar
- 1/2 cup unsalted butter, softened
- 1 large egg
- 1 teaspoon vanilla extract
- 1/2 teaspoon baking powder
- 1/4 teaspoon salt
Instructions
- Preheat the oven to 350°F (175°C).
- In a bowl, cream the butter and sugar until fluffy.
- Add the egg and vanilla extract, mixing well.
- In a separate bowl, whisk together the flour, cocoa powder, baking powder, and salt.
- Gradually add the dry ingredients to the wet mixture until combined.
- Using a spoon, drop alternating spoonfuls of chocolate and vanilla dough onto a baking sheet.
- Bake for 12-15 minutes or until set. Let cool before serving.
Notes
- For an extra touch, drizzle melted chocolate on top of the cookies.
- Store in an airtight container to keep them fresh.
Nutrition
- Serving Size: 1 cookie
- Calories: 120
- Sugar: 10g
- Sodium: 30mg
- Fat: 7g
- Saturated Fat: 4g
- Unsaturated Fat: 2g
- Trans Fat: 0g
- Carbohydrates: 14g
- Fiber: 1g
- Protein: 2g
- Cholesterol: 20mg
Keywords: Zebra Cookies, Homemade Treats, Baking, Desserts